Morphing Two Pictures to See Baby Baby Shower Game
I've helped to host quite a few baby showers over the past several years, and it seems almost universal that the guest of honor/mom-to-be says these two things: (1) "I don't really love baby shower games. No, really, please don't make me look at candy melted in diapers!"; and (2) "It makes me a little uncomfortable to be the center of attention during present opening." I hear you, my friends!
As a result of these common sentiments, I have two favorite go-to baby shower activities that always prove popular with the guest-of-honor and guests alike. I'll share them both with you, starting today with a fun little activity that asks the question "Who Will Baby Look Like?".
I call it Baby Face Mix and Match, and it always results in lots of laughs!

When I was pregnant with my first son, I just couldn't wait to see what my baby would look like. Would he look more like me or Scott? Would he have my big blue eyes and Scott's rosy cheeks? {Yes and Yes} And I know all mom's to be are wondering the exact same thing.
They say a photo is worth a thousand words, so that must mean two photos are worth even more. The Baby Face Mix and Match game takes photos of mom and dad, cut into strips, and asks guest to combine the features together to predict what the baby might look like.

Here's what you'll need:
- Copies of mom and dad's photos, cut into strips {eyes, nose, mouth, etc}. Give each guest a ziplock bag will a full set of strips from mom and dad's photos. I have a Photoshop tutorial below that shows you how I like to do it so that the pieces fit together well and are quick and easy to cut.
- One sheet of paper per guest, for gluing down the face they create. I like to create a page with mom and dad's faces at the top and the question "What will baby look like?" because it creates a great keepsake for mom. Photoshop instructions for this background sheet are below.
- Glue Sticks. Make sure you have one per guest so that this can be a quick and fun activity. You can buy a box of 30 on Amazon {affiliate link} for under $10.
- Clothespins. I generally like to hang a couple pieces of string across the wall in advance, and I sit out a bowl of clothespins so that the guests can clip up their baby face creations for all to see.

I have created this Baby Face game for quite a few baby showers over the years, and it always proves to be popular across all the generations. You can either invite everyone to create their faces at the same time, or you can just sit the pieces out on a table and invite people to create a face at their leisure.


Guests love this activity because it's so quick and easy! Even in a group where the guests don't all know each other, creating the baby faces almost manages to get people laughing and chatting with one another.


My favorite part is seeing all of the faces hanging together on the wall!

It's really amazing how different they all look, and how some combinations create much cuter "baby faces" than others!


*Big thanks to my friend beautiful friend Rebekah for allowing me to use the photos of her and her husband for this post and tutorial!
PHOTOSHOP INSTRUCTIONS
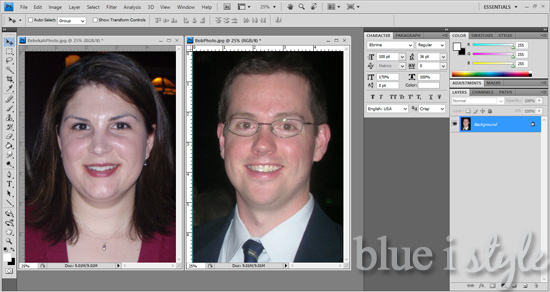
STEP 1: SELECTING THE PHOTOS
To start the process, find photos of the mom-to-be and dad-to-be where is each is facing the camera straight on with nothing covering either of their faces. To print clearly, the photos need to have a minimum resolution of 300 dpi (meaning that photos pulled down off of Facebook won't work well). Additionally, the closer up the photos are, the better. If the face is very small in the original photo, then it is likely that the image quality will not be sufficient when the photo is blown up to the final head and shoulders dimensions of approximately 5.5 inches wide by 7 inches tall.
STEP 2: PREPARING THE PHOTOS
Begin by opening each photo up in Photoshop and cropping each down to just the head and shoulders.
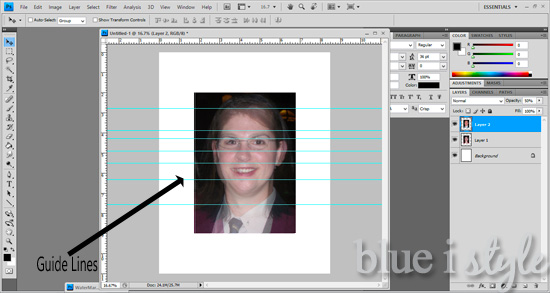
It is also important that heads not be tilted in the photos. The easiest way to ensure that the heads are both straight enough is by using the guides in Photoshop. Pull down one guide line to determine if the pupils of both eyes are more or less in a straight line. {If you are not familiar with guides, here is a quick and easy tutorial from EHow.}
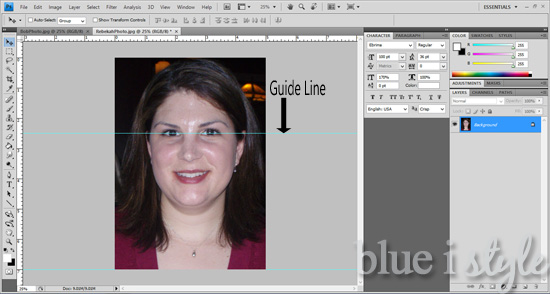
If the head is tilted (if the pupils are not lined up), this can be adjusted using the "Image–>Rotation–>Arbitrary" option in Photoshop. Rotation of just a few degrees either clockwise or counter clockwise will likely be enough to straighten the photo up.
STEP 3: LINING UP FACIAL FEATURES
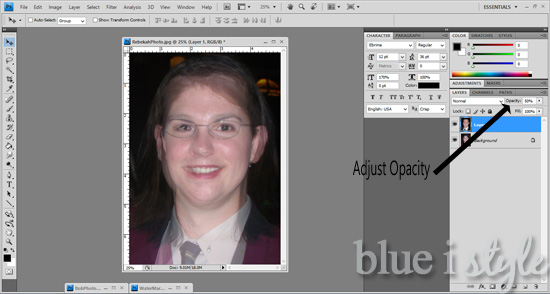
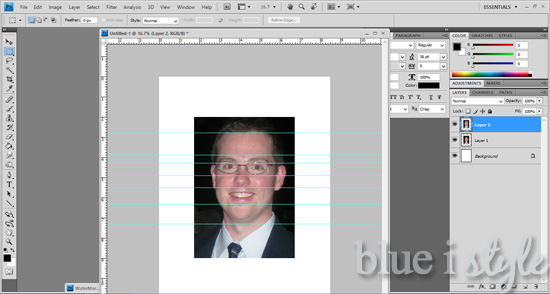
In this step, you'll be making minor adjustments to the size of one or both of the photos so that both of the heads are approximately the same height from top of head to bottom of chin. There are numerous ways to do this, but the method I find easiest is to copy the dad's photo (CTRL+C) and paste it on top of the mom's photo (CTRL+V). Then adjust the opacity of the dad's photo to be 50%. This allows you to see the mom's photo below the dad's, and allows you to see how the facial proportions compare. {Here's a quick tutorial on adjusting opacity, if you need further instructions.}
In the image above, you see that the mom and dad's eyes, nose and mouth line up pretty closely. The dad's face is a bit wider than the mom's, but that's ok. The two faces will never have the exact proportions, but the important part is for adjust the sizes of the photos until the facial features line up approximately from top to bottom {side to side is less important}.
If the size of either photos needs to be adjusted, select the layer you want to adjust, click CTRL+T {or choose "Free Transform" from the Edit menu}, and then hold down the SHIFT key and drag the corners of the selected layer to adjust the size while keeping the proportions the same. Continue adjusting the two layers until both faces are approximately the same size from the top of the head to the bottom of the chin.
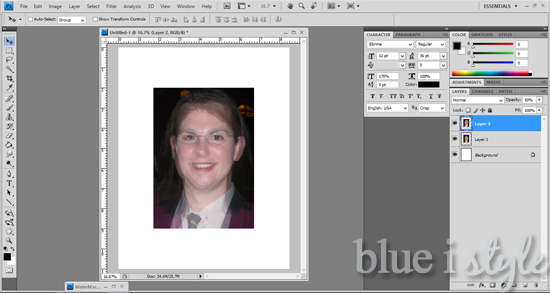
Finally, crop out any excess around either of the faces so that the final image dimensions are exactly the same {I usually aim for a final image size of 5.5″x7″}. Once the faces are sized correctly, save each file. I suggest naming the files, "MomFace" and "DadFace" {using their names in place of Mom and Dad}.
STEP 4: DETERMINE WHERE TO PLACE THE CROP MARKS
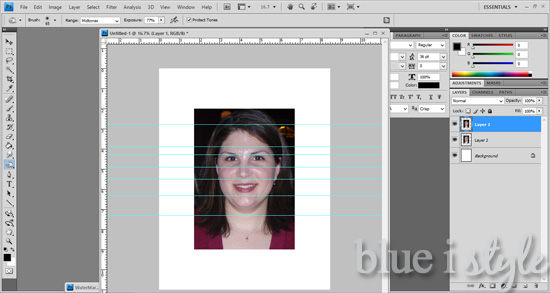
The next step is to prepare the images to be printed and cut into strips, but before this can occur, you need to determine where to cut. Open a new document (CTRL+N), and set the dimensions to 8.5″x11″, the resolution to 300 pixels/inch, and the background color to white. Now open the mom and dads' photos that you saved in the prior step. Copy each photo (CTRL+C), and paste each onto the document (CTRL+V). Both will automatically be centered within the new document, meaning that when you paste in the second photo it will be placed directly on top of the first photo. Just as you did before, change the opacity of the top photo to 50%, so that the lower photo can be seen through the top photo.
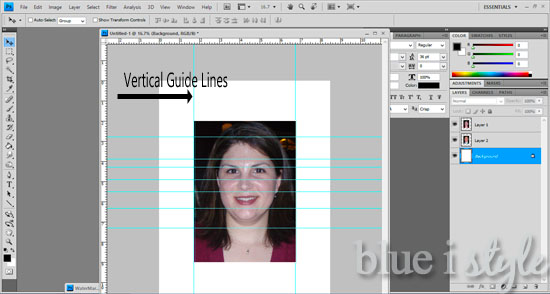
Now, begin pulling down guide lines to determine where the crop marks should be placed so that the images can be cut into the following strips: top of the head, forehead, eyebrows, eyes, nose, mouth, chin, shoulders. {Again, refer to this tutorial from EHow if you need instructions for inserting guide lines.} Once the guide lines are in place, it will look something like this:
By inserting the guide lines while the two faces are layered, you can selected guide line placements that work for both faces {in other words, placement that won't cut through the middle of the eyes on one of the faces}. Once the guidelines are in place, change the opacity of the top face layer back to 100% to get a better look at the top face. Double check that the guide line placement doesn't cut through the center of any facial features.
Then bring the face on the lower layer to the top by right clicking on the photo and selecting "Layer 1," then from the Layer menu, choose Arrange–>Bring to Front. Again double check that the guide line placement doesn't cut through the center of any facial features.
STEP 5: INSERTING THE CROP MARKS
Once you have confirmed that the guide line placement works for both faces, it is time to insert the crop marks. The guide lines will not be visible when the images are printed, so it is necessary to insert lines {crop marks} that will show up on the printed documents. However, you don't want the lines to cross over the actual face, so begin by adding two vertical guide lines on the right and left sides of the photo.
Now use the Line Tool to draw in the crop marks along each of the guide lines to the right and left of the photo. I suggest drawing the crop marks in black and using a line width of 3 pixels.
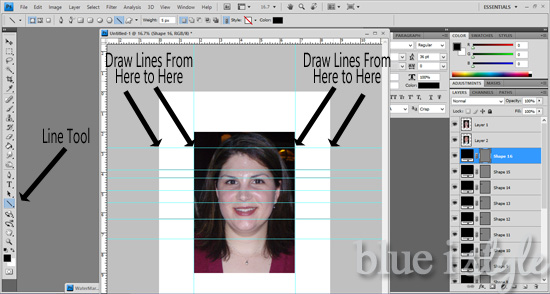
The crop marks that you've drawn in will be hard to see because of the blue guide lines, but once you have finished drawing all the lines, click CTRL+H to hide the blue guide lines. With the guide lines hidden, you will be able to clearly see the crop marks that you have drawn in, and your image will look like this:
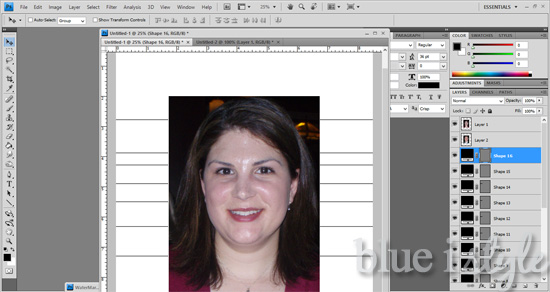
STEP 6: SAVE THE IMAGES
With your crop marks inserted, it is time to save the images. Save as a JPEG, naming the file according to the face that is currently on the top layer (i.e., "MomFaceForPrinting"). DO NOT CLOSE THE FILE YET!! {If you close at this point, when you reopen the image as a JPG you will no longer be able to access the other photo layer}
Now bring the lower layer back to the front {right clicking on the photo, selecting Layer 2, then going to Layer–>Arrange–>Bring to Front}. With the alternate photo in the front click "Save As" {NOT JUST "SAVE"), and name the file accordingly (i.e., "DadFaceForPrinting"), again, saving it as a JPEG. Close the file.
STEP 7: CREATE THE BACKGROUND PAGE
When pieces the face strips together, the baby shower guests will need a page to glue them to. You could certainly just give each guest a blank piece of paper {in which case you can skip this step}, but I prefer to create a background page that looks like this:
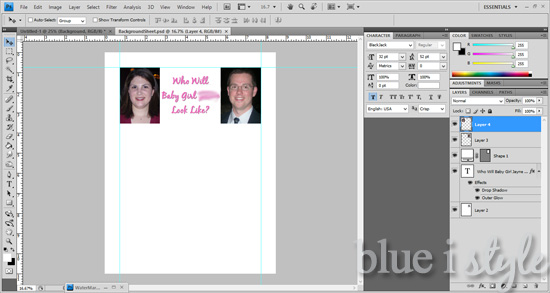
Start by opening a new document (CTRL+N), and set the dimensions to 8.5″x11″, the resolution to 300 pixels/inch, and the background color to white. Then open the files that you named MomFace and DadFace (not MomFaceForPrinting). Resize each photo to 2 inches wide {which will make the height something in the range of 2.8″ inches}.
Copy each photo (CTRL+C) and paste each (CTRL+V) on to the new blank document. When placing the photos, leave a .75 inch margin at the top, left and right of the page. This placement will ensure a large enough margin for printing, while still leaving enough blank space on the page for the face strips to be glued to the page.
Between the photos, add text along the lines of "Who Will Baby Girl ___ Look Like?" Save this document with a file name such as "BackgroundPage."
STEP 8: PRINT AND CUT
This step really doesn't require much explanation, other than to say that it is definitely best to cut one "mom face" and one "dad face" at a time, then place the cut strips of each into an envelope or a ziplock bag before moving on to cut one more of each. If you cut all of the "mom faces" at once, it will become a big headache trying to make sure that you get the right pieces paired together. {TRUST ME!}
STEP 9: OPTIONAL: CREATE AN ONLINE MORPHED IMAGE
This is the optional step, but I think it's a fun addition. I aways like to use an online morphing program, like MorphThing.com to take mom and dad's faces and blend them together to create become one. Just follow the instructions on the website to upload mom and dad's individual photos and morph them together.
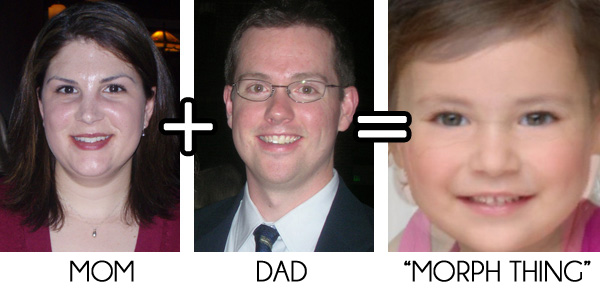
I always think it's the most fun to wait until after all of the baby shower guests have created their baby faces, and then present the morphed photo to mom as something to hold on to and compare to the real baby later months later.
There you have it! I promise it's not as complicated as it might look. Once you get the hang of these quick steps, it becomes really easy to recreate this game for each baby shower you help to host! If you have any questions about how this tutorial, feel free to leave them in the comments below!

Morphing Two Pictures to See Baby Baby Shower Game
Source: https://www.blueistyleblog.com/babyshowerbabyfacemixmatchgame/
0 Response to "Morphing Two Pictures to See Baby Baby Shower Game"
Enviar um comentário